
由于使用NPS服务将多个内网端口穿透至公网,同时内地使用80/443和https服务需要ICP备案。基于这两个问题所以使用vpn技术,将客户端和带有公网服务器组成一个平等的虚拟局域网
第一种:传统服务安装配置节点
由于使用腾讯云服务器,首次登录先创建root密码
ubuntu@VM-16-12-ubuntu:~$ sudo passwd root
New password:
Retype new password:
passwd: password updated successfully
之后使用root账户,对服务器转发进行配置
ubuntu@VM-0-9-ubuntu:~$ su root
root@VM-0-9-ubuntu:/home/ubuntu# sudo apt install wireguard resolvconf -y
#安装wireguard软件
root@VM-0-9-ubuntu:/home/ubuntu# echo "net.ipv4.ip_forward = 1" >> /etc/sysctl.conf
root@VM-0-9-ubuntu:/home/ubuntu# sysctl -p
net.core.somaxconn = 4096
net.ipv4.tcp_max_tw_buckets = 4096
net.ipv4.tcp_slow_start_after_idle = 0
kernel.sysrq = 1
net.ipv6.conf.all.disable_ipv6 = 0
net.ipv6.conf.default.disable_ipv6 = 0
net.ipv6.conf.lo.disable_ipv6 = 0
kernel.printk = 5
net.ipv4.ip_forward = 1
#同过命令查看,确保有添加net.ipv4.ip_forward = 1这条参数。这代表ipv4转发开启,服务器成为ipv4转发节点
#clear清除画面
然后对目录权限做调整
root@VM-0-9-ubuntu:/home/ubuntu# cd /etc/wireguard/
#进入到wireguard目录
root@VM-0-9-ubuntu:/etc/wireguard# chmod 700 /etc/wireguard/
#修改目录权限只有拥有者有读、写、执行权限
root@VM-0-9-ubuntu:/etc/wireguard# umask 077
#umask 077文件的默认权限变为:600(仅所有者可读/写)
#目录的默认权限变为:700(仅对所有者具有读/写/执行权限)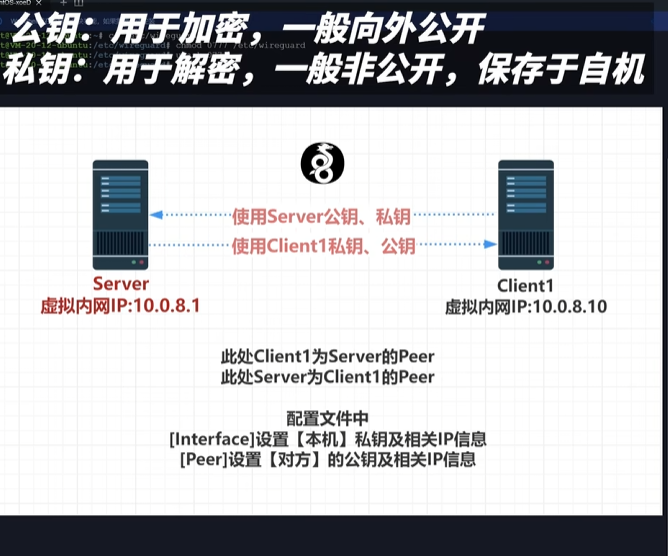
生成服务器私钥
root@VM-0-9-ubuntu:/etc/wireguard# wg genkey > server.key
#生成一个私钥存储在/etc/wireguard下的server.key
root@VM-0-9-ubuntu:/etc/wireguard# ls
server.key
root@VM-0-9-ubuntu:/etc/wireguard# cat server.key
#显示输出server.key的内容
root@VM-0-9-ubuntu:/etc/wireguard# wg pubkey < server.key >server.key.pub
#通过私钥生成公钥
生成客户端私钥
root@VM-0-9-ubuntu:/etc/wireguard# wg genkey > client1.key
#生成客户端私钥
root@VM-0-9-ubuntu:/etc/wireguard# wg pubkey < client1.key > client1.key.pub
#基于客户端私钥创建客户端公钥
使用echo命令生成服务器配置文件
echo "
[Interface]
PrivateKey = $(cat server.key) #填写本机的privatekey内容
Address = 10.0.8.1 #本机虚拟局域网ip

PostUp   = iptables -A FORWARD -i wg0 -j ACCEPT; iptables -A FORWARD -o wg0 -j ACCEPT; iptables -t nat -A POSTROUTING -o eth0 -j MASQUERADE
PostDown = iptables -D FORWARD -i wg0 -j ACCEPT; iptables -D FORWARD -o wg0 -j ACCEPT; iptables -t nat -D POSTROUTING -o eth0 -j MASQUERADE
#注意eth0需要为本机网卡名称

ListenPort = 50819 # 监听端口
DNS = 8.8.8.8
MTU = 1420
[Peer]
PublicKey =  $(cat client1.key.pub)  #自动client1的公钥
AllowedIPs = 10.0.8.10/32 #客户端所使用的IP" > wg0.conf
注意上述参数中的eth0是本机网卡,通过ifconfig查询。在peer中allowedIps参数设置可以是一个IP段,也可以是一个ip。如果是一个段那么使用24掩码例如:192.168.3.0/24 如果是一个ip就使用32掩码
root@VM-0-9-ubuntu:/etc/wireguard# systemctl enable wg-quick@wg0
Created symlink /etc/systemd/system/multi-user.target.wants/wg-quick@wg0.service → /lib/systemd/system/wg-quick@.service.
#看到服务如上提示代表开机自动启动成功
手动开启wireguard
wg-quick up wg0(wg0为配置名称)
#启动wg0

#关闭wg0
wg-quick down wg0
root@VM-0-9-ubuntu:/etc/wireguard# ifconfig
#通过ifconfig能看到wg0就代表服务启动成功
如果需要连接多个节点需要继续创建公钥和私钥,同时对wg0配置文件进行新增peer配置。注意添加配置文件的时候peer名称不能修改,如果修改会导致服务异常无法启动
root@VM-0-9-ubuntu:/etc/wireguard# wg genkey > client2.key

root@VM-0-9-ubuntu:/etc/wireguard# wg pubkey < client2.key > client2.key.pub

echo "
[Peer]
PublicKey =  $(cat client2.key.pub)  #自动client2的公钥
AllowedIPs = 10.0.8.8/32 #客户端Client2所使用的IP" >> wg0.conf
之后重启wg服务
第二种:基于docker搭建节点,通过docker进行配置
客户端的连接
windows
[Interface]
PrivateKey = 6M8HEZioew+vR3i53sPc64Vg40YsuMzh4vI1Lkc88Xo= #此处为client1的私钥
Address = 10.0.8.10 #此处为peer规定的客户端IP
MTU = 1420  #与服务器的mtu一致

[Peer]
PublicKey = Tt5WEa0Vycf4F+TTjR2TAHDfa2onhh+tY8YOIT3cKjI= #此处为server的公钥
AllowedIPs = 10.0.8.0/24 #此处为允许的服务器IP
Endpoint = 114.132.56.178:50814 #服务器对端IP+端口
注意:此处peer中的allowedips是由于有其他节点需要加入,所以不写单个地址而是一整个网段
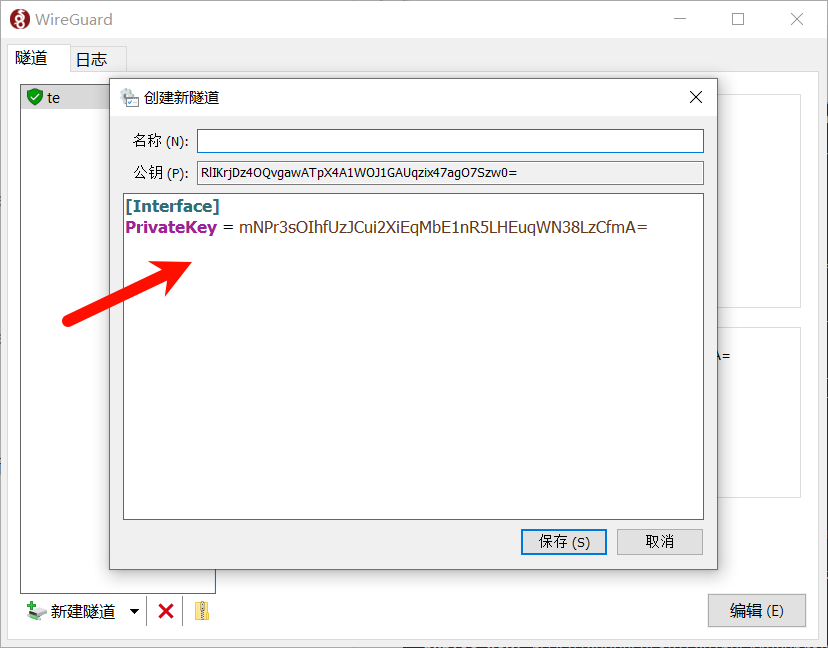
在新建隧道-编辑隧道中填入如上格式配置,保存并连接即可
docker
docker run -d \
  --name=wireguard \
  --cap-add=NET_ADMIN \
  --cap-add=SYS_MODULE  \
  -e PUID=1000 \
  -e PGID=1000 \
  -e TZ=Asia/Shanghai \
  -e SERVERURL=122.51.1.172 \
  -e SERVERPORT=50819  \
  -e PEERDNS=8.8.8.8  \
  -e INTERNAL_SUBNET=10.0.8. \
  -e ALLOWEDIPS=10.0.8.0/24 \
  -e PERSISTENTKEEPALIVE_PEERS=25  \
  -e LOG_CONFS=true \
  -p 51820:51820/udp \
  -v /path/to/wireguard/config:/config \
  -v /lib/modules:/lib/modules \
  --sysctl="net.ipv4.conf.all.src_valid_mark=1" \
  --restart unless-stopped \
registry.cn-heyuan.aliyuncs.com/str108-image/wireguard:latest
评论